Cyanotype effect Photoshop Action

From Wikipedia: Cyanotype is an old monochrome photographic printing process which gives a cyan-blue print.

The English scientist and astronomer Sir John Herschel discovered this procedure in 1842. Though Sir John Herschel is perhaps the inventor of the cyanotype process, it was Anna Atkins, a British scientist, who brought the process into the realm of photography. She created a limited series of cyanotype books that documented ferns and other plant life. By using this process, Anna Atkins is regarded as the first woman photographer.

Let’s ty to replicate the effect.
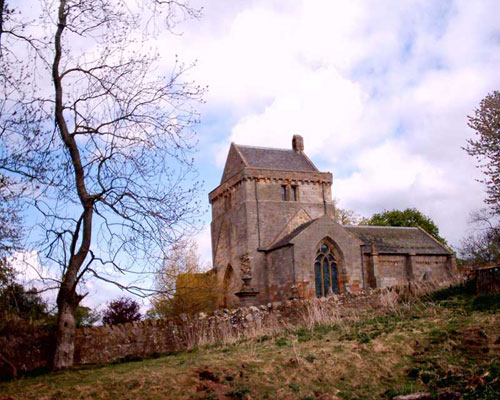
Before

Before Cyanotype

After

After Cyanotype

Download the action and give me feedback, don’t forget to send me your works to have them published.

Rate this post: 1 Star2 Stars3 Stars4 Stars5 Stars (3 votes, average: 5.00 out of 5)
Loading ... Loading ...
Take a look at Photoshop Templates offered by Template Monster. They can be definitely useful if you want to start your own website.
These templates can be easily edited so you are able to customize them to serve you particular needs.
Be my fan on Facebook and follow me on Twitter! Exclusive content for my Facebook fans and Twitter followers

This post has 14 comments

  1. Asif Iqbal

    on August 23, 2006 at 6:23 pm

    Emanuele the download is not working. Also, the example images are not shown. Just thought to let you know.

  2. Emanuele Feronato

    on September 4, 2006 at 9:50 am

    Thank you. Fixed

  3. STACEY

    on October 26, 2006 at 9:46 pm

    Hi Emanuele~
    Thanks for sharing your actions- I love the double sketch, but I can’t get it to work? I tried it on a photo, do I need to create a new layer-is there something else I should do to the photo before runninf the action?
    Please help:)
    Grazie!

  4. Wael Kfoury

    on December 19, 2006 at 12:04 pm

    iqbal

    Interesting post. I came across this blog by accident, but it was a good accident. I have now bookmarked your blog for future use. Best wishes. Wael Kfoury.

  5. Mark

    on January 8, 2007 at 11:37 pm

    Hi Emanuele,

    Your action worked like a charm! It was a nice surprise to see it work so well. Perhaps you can publish some other modern actions for old photographic processes? I am a big fan of Edward Sheriff Curtis and his historic documentation of Native American Indians and priceless artifacts. The gold tone prints from his Copper Photogravure Plates are some of the most beautiful one can see. I will leave you with 2 URL’s so you can see for yourself. Here they are:

    http://www.fluryco.com/curtis/process.htm

    http://pro.corbis.com/popup/Enlargement.aspx?mediauids={54b0de40-3c2b-4ed2-9cbf-4cc8af947d41}|{ffffffff-ffff-ffff-ffff-ffffffffffff}&qsPageNo=1&fdid=&Area=Search&TotalCount=3&CurrentPos=2&WinID={54b0de40-3c2b-4ed2-9cbf-4cc8af947d41}

    Cheers!
    Mark…

  6. Mark

    on January 8, 2007 at 11:44 pm

    P.S. You will need to put the entire bit of the Corbis text as a URL in to your browser to go to Edward S. Curtis page on the Corbis site directly. The image for the supreme gold tone is called the Rush Gatherer by Edward S. Curtis (search Corbis Rush Gatherer Edward S. Curtis). Again, Thank You for your cool actions!!

    Sincerely,
    Mark

  7. Sarah

    on April 13, 2007 at 9:43 am

    Hi!

    I’m really keen to see what you have to say, but can not open the file. It has an odd file extension name. Are you able to save it all as a Word document or something else?

    Thanks!
    Sarah.

  8. Photoshop Adobe

    on October 4, 2007 at 4:12 am

    [...] http://www.emanueleferonato.com/2006/08/19/cyanotype-effect-photoshop-action/ [...]

  9. Will

    on March 11, 2008 at 9:11 am

    Does ANYBODY know how to load this in photoshop?

  10. Max

    on March 18, 2008 at 9:36 pm

    Hi All,

    Here’s how to use the action in PhotoShop C2:

    1. After you’ve downloaded the file from above, unzip it and then doubleclick it. [This part I am not too sure of as it all happened so quickly]. Open an image in PhotoShop.

    2. Pick the Actions palette, which is beside the History palette.

    3. Highlight “Triqui Cyano”.

    4. Click the play button [a small arrow-head pointed to the right].

    5. Click Continue, OK, OK.

    6. Adjust Brightness/Contrast if needed, as suggested.

    7. Smile. You’re done ;-)

  11. Tino

    on June 15, 2008 at 6:15 pm

    Hi,

    I’d think based on the physics of the real process, something like http://picasaweb.google.de/tinowildenhain/Cyanotype would more look like a real cyanotype. I see if I can produce a macro for gimp :-)

  12. Laurent

    on November 12, 2008 at 1:17 pm

    Working well.
    I tried on my side without your action.
    Result can be seen here :

    http://www.facebook.com/photo.php?pid=1067697&l=159dd&id=758638896

    Regards.

    Laurent

  13. dave krueger

    on February 9, 2010 at 9:20 pm

    Hello Emanuele,
    The download does not open.
    I am on a mac. Ive never seen an ‘atn’ file. do you offer any compatible with a mac?
    Thank you!

  14. Gratia Frena

    on January 27, 2011 at 8:15 am

    Hi Emanuele.
    I’m your new reader. I’ve download that action but I don’t know how to install the action file into Photoshop. Can you tell me about that?

    Thank you!