

Create a Flash ball game with visual from above tutorial part 2
Talking about Ball Game game, and Flash.
December 13th update: 3rd part released
January 16th update: 4th part released
This is the second part of the tutorial about the creation of a Flash ball game with visual from above.
I suggest you to read part 1 before reading this post. Here I will start adding features to our game as said in the I Had to do it post.
Let’s start with the creation of the first, and most important, tile:
Exit tile
Well, an exit tile means there is an exit, and if there is an exit there is another level, and if there is another level I need a way to code levels.
I stored all levels in a function, in this way:
function draw_level(number) {
	level = new Array();
	switch (number) {
	case 1 :
		_root.ball_start_x = 0;
		_root.ball_start_y = 0;
		level[0] = new Array(1, 1, 1, 1, 1, 1, 1, 1, 1, 0, 0, 0);
		level[1] = new Array(1, 1, 0, 0, 0, 0, 0, 0, 1, 1, 1, 1);
		level[2] = new Array(1, 1, 1, 0, 1, 1, 1, 0, 0, 0, 0, 1);
		level[3] = new Array(1, 0, 1, 1, 1, 0, 1, 1, 1, 1, 1, 1);
		level[4] = new Array(1, 0, 0, 0, 0, 0, 0, 0, 0, 0, 0, 0);
		level[5] = new Array(1, 0, 1, 1, 1, 1, 1, 1, 0, 1, 1, 1);
		level[6] = new Array(1, 0, 1, 0, 0, 0, 0, 1, 0, 1, 0, 1);
		level[7] = new Array(1, 0, 1, 1, 0, 0, 0, 1, 0, 1, 0, 1);
		level[8] = new Array(1, 0, 0, 1, 0, 1, 1, 1, 0, 1, 0, 1);
		level[9] = new Array(1, 1, 0, 1, 0, 1, 0, 0, 0, 1, 0, 1);
		level[10] = new Array(0, 1, 1, 1, 0, 1, 1, 1, 1, 1, 0, 1);
		break;
	case 2 :
		_root.ball_start_x = 0;
		_root.ball_start_y = 0;
		level[0] = new Array(1, 1, 1, 1, 1, 1, 1, 0, 1, 0, 0, 0);
		level[1] = new Array(0, 0, 0, 0, 0, 0, 0, 0, 1, 1, 1, 1);
		level[2] = new Array(1, 1, 1, 0, 1, 1, 1, 0, 0, 0, 0, 1);
		level[3] = new Array(1, 0, 1, 1, 1, 0, 1, 1, 1, 1, 1, 1);
		level[4] = new Array(1, 0, 0, 0, 0, 0, 0, 0, 0, 0, 0, 0);
		level[5] = new Array(1, 0, 1, 1, 1, 1, 1, 1, 0, 1, 1, 1);
		level[6] = new Array(1, 0, 1, 0, 0, 0, 0, 1, 0, 1, 0, 1);
		level[7] = new Array(1, 0, 1, 1, 0, 0, 0, 1, 0, 1, 0, 1);
		level[8] = new Array(1, 0, 0, 1, 0, 1, 1, 1, 0, 1, 0, 1);
		level[9] = new Array(1, 1, 0, 1, 0, 1, 0, 0, 0, 1, 0, 1);
		level[10] = new Array(0, 1, 1, 1, 0, 1, 1, 1, 1, 1, 0, 1);
		break;
	}
	_root.createEmptyMovieClip("bricks", 2);
	bricks._x = 240-(80*ball_start_x);
	bricks._y = 220-(80*ball_start_y);
	for (y=0; y<=10; y++) {
		for (x=0; x<=11; x++) {
			if (level[y][x]>0) {
				depth = y*12+x;
				place_brick = bricks.attachMovie("brick", "brick_"+depth, bricks.getNextHighestDepth(), {_x:x*80, _y:y*80});
				place_brick.gotoAndStop(level[y][x]);
			}
		}
	}
}
The function accepts one parameter, that will be the level number. In this two-level game, the switch at line 3 loads level 1 (lines 4-18) or level 2 (lines 19-33).
You will notice at lines 5, 6, 20 and 21 two new declarations. ball_start_x and ball_start_y store the starting vertical and horizontal position of the ball in the level.
Lines 36-37 Places the ground according to ball_start_y and ball_start_x position. Remember that in this game the ball remain fixed in the middle of the screen while the background is scrolling.
The rest of the code is explained at part 1, except for line 43 that I will explain later.
Now we have more than 1 level. As much as 2!!
Before we proceed, let me introduce another feature you will get a lot familiar with:
The dead
Since there are several ways to die, I need a function to call everytime the player dies.
function ball_die() {
	bricks._x = 240-(80*_root.ball_start_x);
	bricks._y = 220-(80*_root.ball_start_y);
	xspeed = 0;
	yspeed = 0;
	draw_level(lev);
}
It’s very easy… when the player dies, the ball position is restored to its initial position and both xspeed and yspeed are set to zero. Then redraws the level.
Very, very easy.
Now it’s time to explain how to design tiles.
Look at this picture:
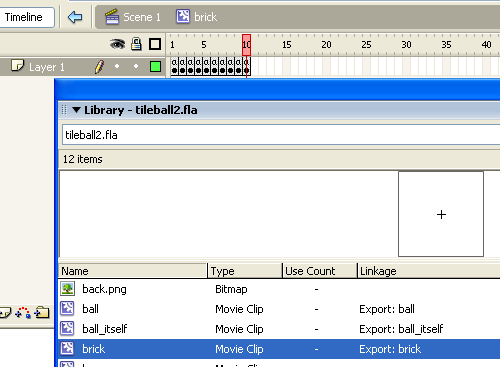
As you can see, the brick movieclip has several frames (10 in the example). Every frame contains a brick type, and has a stop(); in it to… ehm… stop it at the current frame. Now it should be clear why I wrote that line 43 in the level drawing function: I goto and stop the brick instance according to the value stored in the level array.
Now it’s time to design some nasty levels and explain how does it work.
In this tutorial, I’ll design levels 5 bricks tall and 5 bricks wide, but there is (almost) no limit to levels size you can create.
It’s interesting anyway the complexity of some levels, even if so small.
Here it is the actionscript, all in the 1st frame as real PROs…
_root.attachMovie("starz", "starz", 1, {_x:-20, _y:-20});
_root.attachMovie("ball", "ball", 3, {_x:240, _y:220});
ball.texture.setMask(ball.ball_itself);
yspeed = 0;
xspeed = 0;
lev = 1;
draw_level(lev);
ball.onEnterFrame = function() {
	friction = 0.99;
	power = 0.4;
	brick_x = Math.floor((bricks._x-200)/80)*-1;
	brick_y = Math.floor((bricks._y-180)/80)*-1;
	type_of_tile = level[brick_y][brick_x];
	switch (type_of_tile) {
	case 1 :
		// normal tile
		break;
	case 2 :
		// down spin tile
		yspeed += 0.2;
		break;
	case 3 :
		// up spin tile
		yspeed -= 0.2;
		break;
	case 4 :
		// left spin tile
		xspeed -= 0.2;
		break;
	case 5 :
		// right spin tile
		xspeed += 0.2;
		break;
	case 6 :
		// glass tile
		depth = brick_y*12+brick_x;
		bricks["brick_"+depth]._alpha--;
		if (bricks["brick_"+depth]._alpha<1) {
			level[brick_y][brick_x] = 0;
		}
		break;
	case 7 :
		// spin tile
		xspeed *= 1.05;
		yspeed *= 1.05;
		break;
	case 8 :
		// slip tile
		friction = 1;
		power = 0;
		break;
	case 9 :
		// beam
		depth = brick_y*12+brick_x;
		if (bricks["brick_"+depth].lava._currentframe>90) {
			ball_die();
		}
		break;
	case 10 :
		// exit
		lev++;
		_root.removeMovieClip("bricks");
		draw_level(lev);
		break;
	default :
		// hole
		ball_die();
		break;
	}
	if (Key.isDown(Key.LEFT)) {
		xspeed -= power;
	}
	if (Key.isDown(Key.RIGHT)) {
		xspeed += power;
	}
	if (Key.isDown(Key.UP)) {
		yspeed -= power;
	}
	if (Key.isDown(Key.DOWN)) {
		yspeed += power;
	}
	xspeed *= friction;
	yspeed *= friction;
	if ((xspeed<0.1) and (xspeed>-0.1)) {
		xspeed = 0;
	}
	if ((yspeed<0.1) and (yspeed>-0.1)) {
		yspeed = 0;
	}
	bricks._y -= yspeed;
	bricks._x -= xspeed;
	starz._x = -20+((bricks._x-240)/10);
	starz._y = -20+((bricks._y-220)/10);
	this.texture._y += yspeed;
	this.texture._x += xspeed;
	if (this.texture._x>53) {
		this.texture._x -= 63;
	}
	if (this.texture._x<-53) {
		this.texture._x += 63;
	}
	if (this.texture._y>53) {
		this.texture._y -= 63;
	}
	if (this.texture._y<-53) {
		this.texture._y += 63;
	}
};
function ball_die() {
	bricks._x = 240-(80*_root.ball_start_x);
	bricks._y = 220-(80*_root.ball_start_y);
	xspeed = 0;
	yspeed = 0;
	draw_level(lev);
}
function draw_level(number) {
	level = new Array();
	switch (number) {
	case 1 :
		_root.ball_start_x = 0;
		_root.ball_start_y = 0;
		level[0] = new Array(1, 1, 1, 1, 10);
		level[1] = new Array(0, 0, 0, 0, 0);
		level[2] = new Array(0, 0, 0, 0, 0);
		level[3] = new Array(0, 0, 0, 0, 0);
		level[4] = new Array(0, 0, 0, 0, 0);
		break;
	case 2 :
		_root.ball_start_x = 0;
		_root.ball_start_y = 0;
		level[0] = new Array(1, 4, 4, 5, 0);
		level[1] = new Array(0, 0, 0, 1, 0);
		level[2] = new Array(0, 0, 0, 1, 0);
		level[3] = new Array(0, 0, 0, 10, 0);
		level[4] = new Array(0, 0, 0, 0, 0);
		break;
	case 3 :
		_root.ball_start_x = 0;
		_root.ball_start_y = 0;
		level[0] = new Array(1, 6, 6, 4, 0);
		level[1] = new Array(0, 0, 0, 6, 0);
		level[2] = new Array(6, 5, 5, 6, 0);
		level[3] = new Array(6, 0, 0, 0, 0);
		level[4] = new Array(1, 1, 10, 0, 0);
		break;
	case 4 :
		_root.ball_start_x = 0;
		_root.ball_start_y = 0;
		level[0] = new Array(1, 7, 0, 0, 0);
		level[1] = new Array(0, 7, 0, 7, 10);
		level[2] = new Array(1, 3, 0, 1, 0);
		level[3] = new Array(1, 0, 0, 1, 0);
		level[4] = new Array(1, 1, 1, 7, 0);
		break;
	case 5 :
		_root.ball_start_x = 4;
		_root.ball_start_y = 2;
		level[0] = new Array(7, 8, 8, 8, 10);
		level[1] = new Array(1, 0, 0, 0, 0);
		level[2] = new Array(1, 8, 8, 3, 1);
		level[3] = new Array(0, 0, 0, 0, 0);
		level[4] = new Array(0, 0, 0, 0, 0);
		break;
	case 6 :
		_root.ball_start_x = 2;
		_root.ball_start_y = 2;
		level[0] = new Array(2, 8, 9, 8, 9);
		level[1] = new Array(9, 0, 0, 0, 1);
		level[2] = new Array(2, 8, 1, 0, 3);
		level[3] = new Array(0, 0, 0, 0, 4);
		level[4] = new Array(10, 9, 9, 8, 6);
		break;
	case 7 :
		_root.ball_start_x = 2;
		_root.ball_start_y = 2;
		level[0] = new Array(0, 0, 0, 0, 0);
		level[1] = new Array(0, 0, 0, 0, 0);
		level[2] = new Array(0, 0, 1, 0, 0);
		level[3] = new Array(0, 0, 0, 0, 0);
		level[4] = new Array(0, 0, 0, 0, 0);
		break;
	}
	_root.createEmptyMovieClip("bricks", 2);
	bricks._x = 240-(80*ball_start_x);
	bricks._y = 220-(80*ball_start_y);
	for (y=0; y<=4; y++) {
		for (x=0; x<=4; x++) {
			if (level[y][x]>0) {
				depth = y*12+x;
				place_brick = bricks.attachMovie("brick", "brick_"+depth, bricks.getNextHighestDepth(), {_x:x*80, _y:y*80});
				place_brick.gotoAndStop(level[y][x]);
			}
		}
	}
}
I am going to explain in detail only new features. Read step 1 if you do not understand some code.
Lines 1-2: Attaching stars and ball movieclips
Line 3: Masking the ball as explained in Creation of realistic spheres in Flash with textures and masking.
Lines 4-5: Setting ball’s x and y speeds to zero
Line 6: Set starting level at 1. Don’t cheat!!!
Line 7: Calling function to draw levels
Line 8: Beginning of the code to be executed to the ball at every frame
Lines 9-10: Defining friction and power as explained in Flash game creation tutorial – part 1
Lines 11-12: Determining the position of the ball in the level array according to brick movieclip position.
Some explication of those strange numbers:
80: brick width or height
200: movieclip width (500) divided by 2 (500/2=250) minus the half of the brick width or height (250-80/2=210) minus the radius of the ball (10)
180: same thing with movieclip height
Actually, the radius of the ball should not affect ball position but the ball is not in the precise centre of the stage, just radius pixel moved up-left. Why did I do this? Dunno, will be fixed in next tut :)
Line 13: Obtaining the tile type where the ball is rolling on
Line 14: Beginning of code to be executed according to tile type.
Lines 15-17: Normal tile – do nothing
Lines 18-21: Down spinning tile: increase y speed.
Lines 22-33: Up, Left and Right spinning tiles: same thing for the Down spinning tile, adjusting x and y speeds according to the direction to be spinned
Lines 34-41: Glass tile, start breaking once the ball is on it. The actionscript simply decrease the _alpha value of the ball, and once it reaches zero set the array at this position to zero (hole)
Lines 42-46: Spin tile, multiplies actual x and y speeds
Lines 47-51: Slippery tile, setting the friction at 1 and the power at zero means that you can’t control the ball that will continue running at the same speed on the same direction!
Lines 52-58: Laser beam tile: this tile is a movieclip that changes its color once every 90 frames and lasts 30 frames. When the tile is highlighted, it’s deadly. To determine if the tile is in its deadly status, I simply check its current frame. If it’s bigger than 90… ZZZZAP!
Lines 59-64: Your friend, the exit! Increases lev (the actual level), removes the old level from stage and draws the new one
Lines 65-68: Default tile… I mean no tile… hole… death… avoid it!
Lines 70-108: “Engine” of the game, the same explained in part 1.
Lines 109-115: Death routine, explained above
Lines 116-195: Level creation routine, with 6 levels (and an “end” level).
Try to finish the game!
And this is where part 2 ends. There are tons of new features waiting to be explained during next tutorial… all your suggestion will be included… suggest and get credited in the final game!
Meanwhile, thanks to Fairlyn (slippery tile) and Frederik J (lava tile, in this game converted in beam tile).
Download the source code and give me feedback.
Read 3rd part.
Never miss an update! Subscribe, and I will bother you by email only when a new game or full source code comes out.