Create a vintage photo effect in Photoshop
- October 15, 2007 by Emanuele Feronato
- Filed under Photoshop | 63 Comments
Today I was playing with Photoshop looking for some interesting photo effect and I found a quick and easy way to convert a modern photo in a vintage one.
I have already created an action to simulate this effect in Vintage colors effect action for Photoshop, but I am sure you’ll like this effec too.
Follow me through this very easy tutorial and you’ll find by yourself how easy is to achieve this effect.
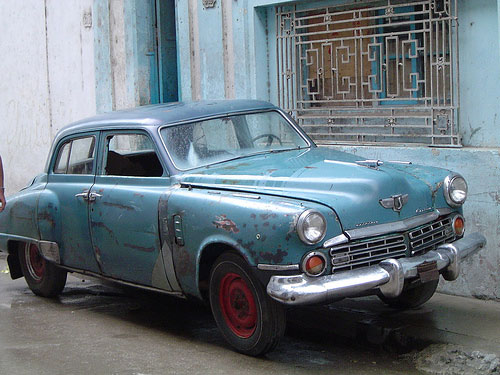
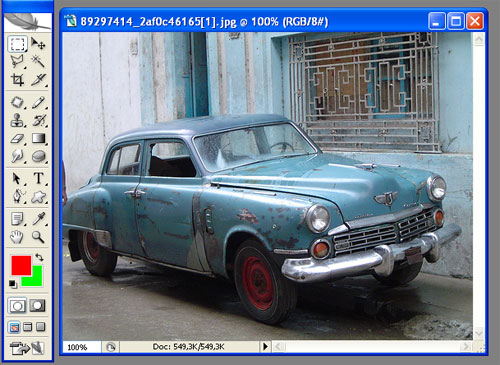
1) Open your photo

2) Set your foreground and background colors respectively to #ff0000 and #00ff00

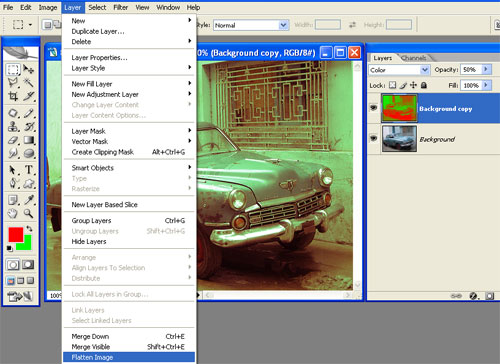
3) Duplicate the photo layer

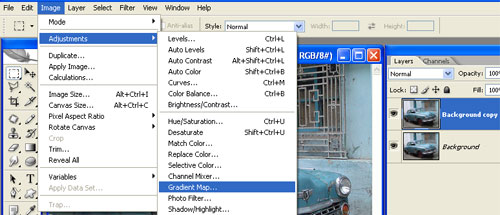
4) With the newly created layer use a Gradient Map

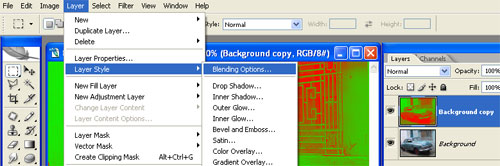
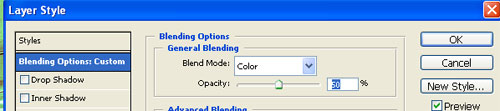
5) On the same layer, use Blending Options

6) Select Blend Mode to Color and Opacity to 50%

7) Flatten the image

8) Apply an Add Noise filter to the only layer you should have

9) Set the filter with 2% Gaussian Monochromatic values

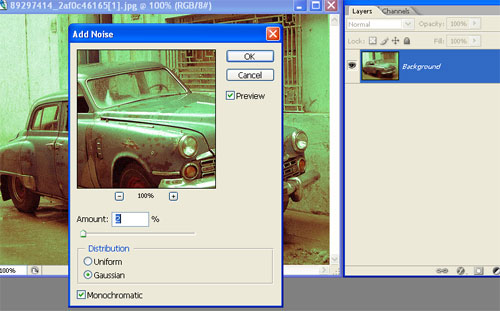
10) Enjoy the result

You may need to play with the last two steps values in order to fit the effect to your needs.
And for the laziest of you, I made an action that does the task automatically! Download the action.
These templates can be easily edited so you are able to customize them to serve you particular needs.
63 Responses
Leave a Reply
TUTORIAL SERIES:
- Una guida completa al gioco del poker online e una selezione dei migliori casino online.
- casino online
- migliori casino online
- BlackJack online
- casinò online

(55 votes, average: 4.53 out of 5)

A simple but a nice looking effect.
The tutorial is great.Could you please indicate which gradient should be use for grayscale mapping.
Exelente!
great tutorial! thanks for the action! :D
great! thanx for the tutorial!
nwayz, i played around with it using the following colors:
foreground color: FF00EA (pink)
background color: CAE200 (lime green)
it produced nice results still.. ;)
thanx for the ps action..hehe
I love it!! thats wut i was looking for!!
help… i downloaded the action but i don’t know where to find it?? where can i find it?? help….
i dont really think that looks like its a vintage photo it looks just like a green contrast we were born for this!!!!!
this person is absoulutley right i hated that part mi picture loooks kind of bad i want mi picture to look more vintagey i gotta get thruu this.
i really like this tutorial..real nice..what’s even more interesting is the different kinds of results you get when you play around with all sorts of colors and blending modes..
but i guess, the picture you have (the car) is really well suited for this effect..maybe that’s why other people were complaining why they didn’t have the same results that you showed here.. ;)
[...] Vintage photo effect [...]
[...] Vintage photo effect [...]
Do you have a larger size version of the photo used here?
cool~~~i like it,thanks!
[...] Vintage photo effect [...]
[...] Create a vintage photo effect in Photoshop [...]
[...] Vintage photo effect [...]
[...] Vintage photo effect [...]
vary good
[...] Vintage photo effect [...]
[...] Vintage photo effect [...]
simple & nice, great to come across this tutorial.
“And for the laziest of you, I made an action that does the task automatically! Download the action.”
Thanks for thinking of me! =p
[...] Vintage photo effect [...]
[...] 7. Create a vintage photo effect in Photoshop [...]
how do I run the action??
thx!
[...] Vintage photo effect [...]
[...] Vintage photo effect [...]
I really don’t want to be mean but my photo looks crappy nd I did it exactly like this :/
Thanks so much, this was awesome!
Create a vintage photo effect Photoshop Tutorial…
I have already created an action to simulate this effect in Vintage colors effect action for Photoshop, but I am sure you’ll like this effect too….
[...] Vintage photo effect [...]
Great effect. I used it and it works well. I also add in some yellow and desaturate a little
Great! Really cool!
this was excellent thank you heaps <3
simple & nice, great to come across this tutorial.
[...] Create A Vintage Photo Effect In Photoshop [...]
[...] Vintage photo effect [...]
[...] 12.Create a vintage photo effect in Photoshop [...]
Great and simple tutorial! The colors that you chose are perfect.
Nice job!
[...] http://www.emanueleferonato.com/2007/10/15/create-a-vintage-photo-effect-in-photoshop/ CategoriasPhotoshop Comentários (0) Trackbacks (0) Deixe um comentário [...]
This is great. You have no idea how glad I am to have found this site, and I really appreciate your effort in putting this together.
Just to add to the one person who said it looks bad. On certain pictures a Blend Mode Opacity of 50% will be too much, but if you experiment around on these pictures, it’s usually just a case of setting this level at 25%-35% instead.
Thanks! This looks cool, but I don’t know if it worked as well on my picture of an older house near my brother’s school…cool effect anyway! And that’s a cool pic of the car too = D
I didn’t use the lime green as my background color though, I used #f9d64c and I thought the gold/yellow worked really well as well. I had a higher noise % too. I guess it depends on the picture?
[...] Vintage Photo Effect (Modas? geçmi? foto?raf [...]
[...] Vintage photo effect [...]
[...] Vintage Photo Effect (Modas? geçmi? foto?raf [...]
[...] 3- Modas? Geçmi? Foto?raf Efekti Vermek [...]
great! thanx for the tutorial!
[...] een SLR, want het kost niks en je hebt direct resultaat. Inderdaad, waarom niet in Photoshop. KLIK __________________ Een vicieuze cirkel waar je kan aan sterven, is niet kunnen eten van de [...]
great!!!!!!!!!!!!!..
[...] http://www.emanueleferonato.com/2007/10/15/create-a-vintage-photo-effect-in-photoshop/ [...]
[...] Create A Vintage Photo Effect in Photoshop [...]
[...] Create A Vintage Photo Effect in Photoshop [...]
[...] Create A Vintage Photo Effect in Photoshop [...]
excellent combination in colour
I love this effect! Thanks!
[...] Create A Vintage Photo Effect in Photoshop [...]
[...] Create a vintage photo effect [...]
That looks like one of Rick Sammon’s photos from Cuba.
[...] Create A Vintage Photo Effect in Photoshop [...]
[...] Create a vintage photo effect [...]
[...] ABRIR TUTORIAL If you enjoyed this article please consider sharing it! [...]