

Understanding Flash displacement map filter
Talking about Flash.
The displacement map filter is a Flash built in feature that can add realism to some special effects.
This is a standalone tutorial but it’s in some way connected with the Creation of realistic spheres in Flash with textures and masking tutorial
Before we continute, let’s read what’s explaining Wikipedia about displacement mapping:
“Displacement mapping is an alternative computer graphics technique in contrast to bump mapping, normal mapping, and parallax mapping, using a (procedural-) texture- or height map to cause an effect where the actual geometric position of points over the textured surface are displaced, often along the local surface normal, according to the value the texture function evaluates to at each point on the surface. It gives surfaces a great sense of depth and detail, permitting in particular self-occlusion, self-shadowing and silhouettes; on the other hand, it is the most costly of this class of techniques owing to the large amount of additional geometry.”
We can achieve displacement mapping in Flash with the DisplacementMapFilter class
The DisplacementMapFilter class uses pixel values from a BitmapData object (known as the displacement map image) to perform a displacement effect on a new object.
A displacement effect involves displacing pixels in the filtered image, shifting them away from their original location to a new one.
The location and amount of displacement applied to a given pixel is determined by the color value of the displacement map image.
This means that the colors in the displacement map image will change the appearance of the main image
There are some additional parametes you can configure to fit the displacement map to your needs:
Map point: The location on the filtered image at which the top-left corner of the displacement filter will be applied. You can use this if you only want to apply the filter to part of an image.
X component: Which color channel of the map image affects the x position of pixels.
Color channels are defined in this way:
1: Red
2: Green
4: Blue
8: Transparent
Y component: Which color channel of the map image affects the y position of pixels.
X scale: A multiplier value that specifies how strong the x axis displacement is.
Y scale: A multiplier value that specifies how strong the y axis displacement is.
Filter mode: Determines what Flash Player should do in any empty spaces created by pixels being shifted away. The options, defined as constants in the DisplacementMapFilterMode class, are to display the original pixels (filter mode “ignore”), to wrap the pixels around from the other side of the image (filter mode “wrap”, which is the default), to use the nearest shifted pixel (filter mode “clamp”), or to fill in the spaces with a color (filter mode “color”).
If you select the “color” option, you will need to declare the alpha and color properties of the filter.
End of the boring part… now let’s see some examples:
Let’s consider this checkered image:

This is the main image, and now we will apply a displacement image to this one. You will see how different displacement images will bring very different results.
First of all, let’s understand how colors in the displacement map affect pixels in the main image.
A color is made of three color component (Red, Green, Blue) and transparency (Alpha)
Each component ranges from 0 to 255, or FF in hexadecimal. This means that 80 is the middle value. Every higher value will increase the shifting, while every lower value will decrease it.
Does it sound complicate?
Let’s see a piece of actionscript… it’s all in 13 lines…
attachMovie("bg","bg",1);
attachMovie("displace","displace",2)
channel1 = 1;
channel2 = 2;
x_mult = 40;
y_mult = 40;
mode = "clamp";
offset = new flash.geom.Point(0, 0);
bmp = new flash.display.BitmapData(500, 250);
displacement_map = new flash.filters.DisplacementMapFilter(bmp, offset, channel1, channel2, x_mult, y_mult, mode);
bmp.draw(displace);
bg.filters = [displacement_map];
displace._visible = false;
Line 1: Attaching the background on stage (the red/blue checkboard)
Line 2: Attaching the displacement map on stage (in the first example is a #808080 rectangle)
Line 3: Assigning the value 1 (red) to the variable that will represent the X component
Line 4: Assigning the value 2 (green) to the variable that will represent the Y component
Line 5: Setting the variable that will represent the X scale to 40
Line 6: Setting the variable that will represent the Y scale to 40
Line 7: Setting the variable that will represent the filter mode to “clamp”
Line 8: defining a new point for the offset of the displacement map
Line 9: creating a new BitmapData item of the same size of the movie. You can see some more information of BitmapData in the Shuffle an image with BitmapData tutorial
Line 10: Create the displacement map itself
Line 11: Draw the displacement map in the bitmap data
Line 12: Applying the displacement filter to the checkered object
Line 13: Setting the displacement map to invisible
The result of this displacement is:
Exactly the same as the original, because the displacement image is “neutral”.
As you can see, I am using images to show results instead of movieclips for a better readability/loading speed
Let’s change the displacement map with this one:

The result is:
Still the same, because the rectangle is filled with #808000 and I am considering only red and green channels
Now let’s try something more interesting:
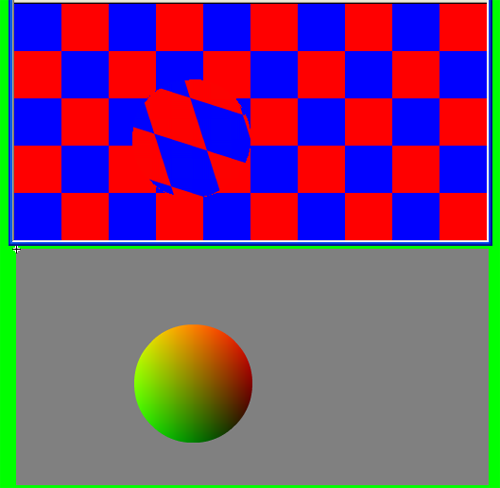
Here you can see a displacement map (at the bottom) and the results (at the top). You can create interesting effect combining reds and greens.

Look at the last one. Now it’s time to code something more interesting and see it in action
attachMovie("bg", "bg", 1);
attachMovie("displace", "displace", 2);
displace._visible = false;
channel1 = 1;
channel2 = 2;
x_mult = 30;
y_mult = 30;
mode = "clamp";
starting_position = 0;
mult = 1;
displace.onEnterFrame = function() {
	starting_position += mult;
	if (starting_position>349) {
		mult = -1;
	}
	if (starting_position<1) {
		mult = 1;
	}
	offset = new flash.geom.Point(starting_position, 0);
	bmp = new flash.display.BitmapData(500, 250);
	displacement_map = new flash.filters.DisplacementMapFilter(bmp, offset, channel1, channel2, x_mult, y_mult, mode);
	bmp.draw(displace);
	bg.filters = [displacement_map];
};
With this code I simply move the displacement map from left to right... and watch the result on another kind of checker board... watch it for a couple of hours...
And... do you remember the Creation of realistic spheres in Flash with textures and masking tutorial?
This is how I modified the last example from line 6 to line 19:
power = 0.3;
yspeed = 0;
xspeed = 0;
friction = 0.95;
_root.attachMovie("ball", "ball", 1, {_x:250, _y:175});
// new code
attachMovie("displace", "displace", 2);
displace._visible = false;
channel1 = 1;
channel2 = 2;
x_mult = 30;
y_mult = 30;
mode = "color";
offset = new flash.geom.Point(0, 0);
bmp = new flash.display.BitmapData(500, 250);
displacement_map = new flash.filters.DisplacementMapFilter(bmp, offset, channel1, channel2, x_mult, y_mult, mode);
bmp.draw(displace);
ball.texture.filters = [displacement_map];
// end of new code
ball.texture.setMask(ball.ball_itself);
ball.onEnterFrame = function() {
	if (Key.isDown(Key.LEFT)) {
		xspeed -= power;
	}
	if (Key.isDown(Key.RIGHT)) {
		xspeed += power;
	}
	if (Key.isDown(Key.UP)) {
		yspeed -= power;
	}
	if (Key.isDown(Key.DOWN)) {
		yspeed += power;
	}
	xspeed *= friction;
	yspeed *= friction;
	this._y += yspeed;
	this._x += xspeed;
	this.texture._y += yspeed;
	this.texture._x += xspeed;
	if (this.texture._x>158) {
		this.texture._x -= 188;
	}
	if (this.texture._x<-158) {
		this.texture._x += 188;
	}
	if (this.texture._y>158) {
		this.texture._y -= 188;
	}
	if (this.texture._y<-158) {
		this.texture._y += 188;
	}
};
and this is what I got...
We are very close to the creation of the perfect realistic sphere... let me know if you get some interesting results playing with the parameters... take the source codes and give me feedback.
Never miss an update! Subscribe, and I will bother you by email only when a new game or full source code comes out.