

Create a Flash ball game with visual from above tutorial part 4
Talking about Ball Game game, Flash and Game development.
In the 4th part I am going to explain a feature that a race game must have: the laps
Read steps 1, 2 and 3 before continuing
Having laps in a track will result in a longer race.
The bad thing is that if you don’t design laps with some more actionscript than normally required, your players will cheat.
Look at the picture:
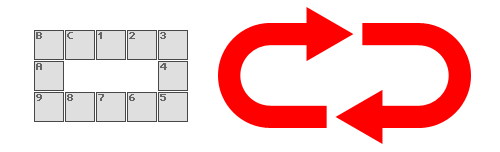
We have our track with 12 tiles with a clockwise direction. Assuming that you will start from 1, you should race through 1-2-3-4-5-6-7-8-9-A-B-C then 1 again in order to make a lap.
So when the ball rolls over C, it’s a new lap.
Wrong.
A cheater could move this way: 1-C-1-C-1 and he already completed 2 laps.
At this point, you would put an intermediate lap, let’s say at tile 7, and check that the intermediate lap has been passed before rolling over C. Now the player will have to drive through 1-2-3-4-5-6-7 but… let’s say the second part of the track is hardest than the first… he could make 1-2-3-4-5-6-7-6-5-4-3-2-1-C completing a lap without passing over 8-9-10-A-B, the hard part of the track.
To prevent this, you can put some “one way” tiles… if the tile 1 can be passed only from left to right, there is no way for the player to make 1-C because the game won’t allow it… but in some cases I would need to make 1-C, maybe he needs more speed to pass a certain tile (let’s say 3) and he founds himself at 2 without speed. He would need to make 2-1-C-B-C-1-2-3…
If you try to solve the lap problem this way, the player won’t be able to do 1-C to gain speed
Well, what about placing another intermediate lap, let’s say at A, so the player must pass over 7, then A and then C?
This may work, unless the path from A to C is harder than A to 1… so you may place an intermediate lap on B… and you end with an intermediate lap at every tile.
My solution allows to manage laps with only three tiles, one next to another. Let’s say C-1-2
The player will pass a lap when he rolls over C-1-2 but only if he never passed over tile 1 more than once. This means that a 1-C-1-2 does not count as a lap because he passed over the 1 twice.
Let’s see some actionscript: basically it’s the same as Create a Flash ball game with visual from above tutorial part 3 so I will comment only the new lines
_root.attachMovie("starz", "starz", 1, {_x:-20, _y:-20});
_root.attachMovie("ball", "ball", 3, {_x:240, _y:220});
_root.attachMovie("info_panel", "info_panel", 4, {_y:410, _alpha:50, _visible:false});
_root.attachMovie("lap", "lap", 5);
ball.texture.setMask(ball.ball_itself);
yspeed = 0;
xspeed = 0;
checkpoint_passed = false;
lev = 1;
draw_level(lev);
laps = 0;
ball.onEnterFrame = function() {
	info_panel._visible = false;
	friction = 0.99;
	power = 0.4;
	brick_x = Math.floor((bricks._x-200)/80)*-1;
	brick_y = Math.floor((bricks._y-180)/80)*-1;
	type_of_tile = level[brick_y][brick_x];
	if (type_of_tile>12000) {
		message_to_show = messages[type_of_tile%12000];
		type_of_tile = 12;
	}
	if (type_of_tile>10000) {
		lap_sequence = type_of_tile-10000;
		if ((lap_sequence == lap_to_go) and (lap_sequence == 1)) {
			laps++;
			lap.laptext.text = laps;
		}
		lap_to_go = lap_sequence%3+1;
		type_of_tile = 1;
	}
	switch (type_of_tile) {
	case 1 :
		// normal tile
		break;
	case 2 :
		// down spin tile
		yspeed += 0.2;
		break;
	case 3 :
		// up spin tile
		yspeed -= 0.2;
		break;
	case 4 :
		// left spin tile
		xspeed -= 0.2;
		break;
	case 5 :
		// right spin tile
		xspeed += 0.2;
		break;
	case 6 :
		// glass tile
		depth = brick_y*12+brick_x;
		bricks["brick_"+depth]._alpha--;
		if (bricks["brick_"+depth]._alpha<1) {
			level[brick_y][brick_x] = 0;
		}
		break;
	case 7 :
		// spin tile
		xspeed *= 1.05;
		yspeed *= 1.05;
		break;
	case 8 :
		// slip tile
		friction = 1;
		power = 0;
		break;
	case 9 :
		// beam
		depth = brick_y*12+brick_x;
		if (bricks["brick_"+depth].lava._currentframe>90) {
			ball_die();
		}
		break;
	case 10 :
		// exit
		checkpoint_passed = false;
		lev++;
		_root.removeMovieClip("bricks");
		draw_level(lev);
		break;
	case 11 :
		// reverse
		power *= -1;
		break;
	case 12 :
		// info
		info_panel._visible = true;
		info_panel.message_text.text = message_to_show;
		break;
	case 13 :
		//checkpoint
		checkpoint_passed = true;
		save_x = brick_x;
		save_y = brick_y;
		break;
	default :
		// hole
		ball_die();
		break;
	}
	if (Key.isDown(Key.LEFT)) {
		xspeed -= power;
	}
	if (Key.isDown(Key.RIGHT)) {
		xspeed += power;
	}
	if (Key.isDown(Key.UP)) {
		yspeed -= power;
	}
	if (Key.isDown(Key.DOWN)) {
		yspeed += power;
	}
	xspeed *= friction;
	yspeed *= friction;
	if ((xspeed<0.1) and (xspeed>-0.1)) {
		xspeed = 0;
	}
	if ((yspeed<0.1) and (yspeed>-0.1)) {
		yspeed = 0;
	}
	bricks._y -= yspeed;
	bricks._x -= xspeed;
	starz._x = -20+((bricks._x-240)/10);
	starz._y = -20+((bricks._y-220)/10);
	this.texture._y += yspeed;
	this.texture._x += xspeed;
	if (this.texture._x>53) {
		this.texture._x -= 63;
	}
	if (this.texture._x<-53) {
		this.texture._x += 63;
	}
	if (this.texture._y>53) {
		this.texture._y -= 63;
	}
	if (this.texture._y<-53) {
		this.texture._y += 63;
	}
};
function ball_die() {
	bricks._x = 240-(80*_root.ball_start_x);
	bricks._y = 220-(80*_root.ball_start_y);
	xspeed = 0;
	yspeed = 0;
	lap_to_go = 2;
	draw_level(lev);
}
function draw_level(number) {
	yspeed = 0;
	xspeed = 0;
	level = new Array();
	messages = new Array();
	switch (number) {
	case 1 :
		_root.ball_start_x = 1;
		_root.ball_start_y = 0;
		if (checkpoint_passed) {
			_root.ball_start_x = save_x;
			_root.ball_start_y = save_y;
		}
		level[0] = new Array(1, 10001, 10002, 10003, 1);
		level[1] = new Array(1, 0, 0, 0, 1);
		level[2] = new Array(1, 0, 0, 0, 1);
		level[3] = new Array(1, 0, 0, 0, 1);
		level[4] = new Array(1, 1, 1, 1, 1);
		messages[1] = "Welcome to the game";
		messages[2] = "You are about to cross a checkpoint";
		messages[3] = "Ok. Now suicide! You'll respawn on the checkpoint";
		break;
	case 2 :
		_root.ball_start_x = 0;
		_root.ball_start_y = 0;
		level[0] = new Array(1, 4, 4, 5, 0);
		level[1] = new Array(0, 0, 0, 1, 0);
		level[2] = new Array(0, 0, 0, 1, 0);
		level[3] = new Array(0, 0, 0, 10, 0);
		level[4] = new Array(0, 0, 0, 0, 0);
		break;
	case 3 :
		_root.ball_start_x = 0;
		_root.ball_start_y = 0;
		level[0] = new Array(1, 6, 6, 4, 0);
		level[1] = new Array(0, 0, 0, 6, 0);
		level[2] = new Array(6, 5, 5, 6, 0);
		level[3] = new Array(6, 0, 0, 0, 0);
		level[4] = new Array(1, 1, 10, 0, 0);
		break;
	case 4 :
		_root.ball_start_x = 0;
		_root.ball_start_y = 0;
		level[0] = new Array(1, 7, 0, 0, 0);
		level[1] = new Array(0, 7, 0, 7, 10);
		level[2] = new Array(1, 3, 0, 1, 0);
		level[3] = new Array(1, 0, 0, 1, 0);
		level[4] = new Array(1, 1, 1, 7, 0);
		break;
	case 5 :
		_root.ball_start_x = 4;
		_root.ball_start_y = 2;
		level[0] = new Array(7, 8, 8, 8, 10);
		level[1] = new Array(1, 0, 0, 0, 0);
		level[2] = new Array(1, 8, 8, 3, 1);
		level[3] = new Array(0, 0, 0, 0, 0);
		level[4] = new Array(0, 0, 0, 0, 0);
		break;
	case 6 :
		_root.ball_start_x = 2;
		_root.ball_start_y = 2;
		level[0] = new Array(2, 8, 9, 8, 9);
		level[1] = new Array(9, 0, 0, 0, 1);
		level[2] = new Array(2, 8, 1, 0, 3);
		level[3] = new Array(0, 0, 0, 0, 4);
		level[4] = new Array(10, 9, 9, 8, 6);
		break;
	case 7 :
		_root.ball_start_x = 2;
		_root.ball_start_y = 2;
		level[0] = new Array(0, 0, 0, 0, 0);
		level[1] = new Array(0, 0, 0, 0, 0);
		level[2] = new Array(0, 0, 1, 0, 0);
		level[3] = new Array(0, 0, 0, 0, 0);
		level[4] = new Array(0, 0, 0, 0, 0);
		break;
	}
	_root.createEmptyMovieClip("bricks", 2);
	bricks._x = 240-(80*ball_start_x);
	bricks._y = 220-(80*ball_start_y);
	for (y=0; y<=4; y++) {
		for (x=0; x<=4; x++) {
			if (level[y][x]>0) {
				depth = y*12+x;
				place_brick = bricks.attachMovie("brick", "brick_"+depth, bricks.getNextHighestDepth(), {_x:x*80, _y:y*80});
				frame_to_stop = level[y][x];
				if (frame_to_stop>10000) {
					frame_to_stop = 1;
				}
				if (frame_to_stop>12000) {
					frame_to_stop = 12;
				}
				place_brick.gotoAndStop(frame_to_stop);
			}
		}
	}
}
Line 4: Attaching a movieclip to display laps
Line 11: Variable counting the number of laps
Line 23: Checking if the type of tile is greater than 10000. In my game, lap tiles are 10001, 10002 and 10003
Line 24: Obtaining the lap sequence: 1, 2 or 3, according on which tile the ball is rolling on
Line 25: If the lap sequence is equal to a variable called lap_to_go (it stores the next lap sequence to go in order to complete the lap as you will see later) and its value is 1 (the 10001 tile, the one that represents the start)
Line 26: Increase the number of laps
Line 27: Display the number of laps
Line 29: Calculating the value of the next tile in order to make a correct lap
Line 30: Defining the type of tile (a normal one)
Line 164: Level design of lap tiles
Lines 237-239: Showing the default tile if its number is greater than 10000
As you can see, now you have laps!
Now you have a lot more gamplay options with this engine… download the source code and create the ultimate game!
Never miss an update! Subscribe, and I will bother you by email only when a new game or full source code comes out.