

New tile based platform engine – more theory
Talking about Platform game game, Actionscript 2, Flash and Game development.
This post continues New tile based platform engine – theory behind the player and answers some questions made in these days.
In this part I’ll explain how to determine collisions between the player and the walls.
Once I know player position (easy to know thanks to _x and _y for AS2 or x and y for AS3), and its horizontal and vertical speed (determined in various ways according to keys pressed, terrain types, gravity and so on), I can forecast its future position.
Once I know player’s future position, I have to check all four corner spots (the ones marked with a yellow pixel in the picture shown at New tile based platform engine – theory behind the player and see if these points are in an empty, walkable area.
If they are in an empty area, I just update player position and restart the process.
If at least one of the four corners are in a unwalkable area, I have to move the player as close as I can to its future position while keeping it into a walkable area.
First, let’s see how do I check for player corners
function get_edges() {
    // right edge
    right = Math.floor((x_pos+5)/tile_size);
    // left edge
    left = Math.floor((x_pos-6)/tile_size);
    // bottom edge
    bottom = Math.floor((y_pos+8)/tile_size);
    // top edge
    top = Math.floor((y_pos-9)/tile_size);
    // adjacent tiles
    top_right = level[top][right];
    top_left = level[top][left];
    bottom_left = level[bottom][left];
    bottom_right = level[bottom][right];
}
As you can see, I just operate on x_pos and y_pos (player’s future x and y centre positions) adding or subtracting the right amount of pixels to reach the four corners.
Once I have the left, right, top and bottom tiles, I just have to retrieve values in the level array, so the tile type at the top left corner will be level[top][left], the one at the bottom right will be level[bottom][right] and so on.
Divide et impera
Also known as divide and conquer, this rule will make you life easier.
Let’s look at this picture:
The green player is falling down and moving to the right, and we calculated next frame position (the transparent one).
As you can see, red circles show us the corners that would collide into the wall.
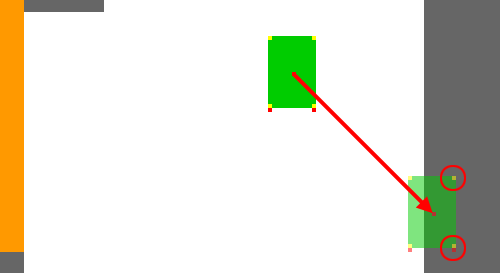
To determine the last possible position (the last one with all four corners outside the wall) we should determine player’s angle using trigonometry and trackback its movement until all corners are clean.
While possible and quite accurate, this process is not so easy to perform because of the approximation of trigonometry functions.
It’s much better to check collisions this way
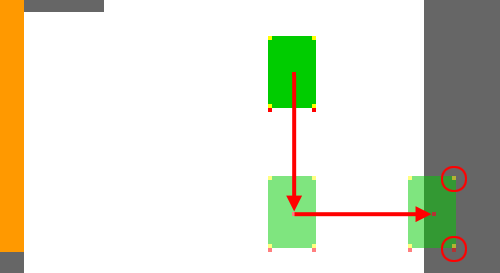
In this picture I divided the down-right movement in two separate movements: a down one and a right one.
It’s not that important which one you will check first: in any case you will end, in case of collision, with an horizontal or vertical movement to backtrack, that is much more easy to do, while not so correct in a real world ruled by physic.
Anyway, this is not a physic engine but a platform/arcade one, so this is absolutely the best way to check for collisions.
Some bug fixes
I would like to thank superdean that explained and fixed the so-called “infamous Ladder Bug”.
You can find all details in this post and it will be officially included in the code in next update.
There was another bug that caused player to get stuck into the wall if jumping to the right and hitting a wall.
This bug appeared in part 6 and was fixed in part 7.
Just remove these two instructions
x_pos = Math.round(x_pos);
y_pos = Math.round(y_pos);
And everything will work fine.
Next update… coins and spikes!!
Never miss an update! Subscribe, and I will bother you by email only when a new game or full source code comes out.