

Pure AS3 magnifying effect using Displacement Map Filter
Talking about Actionscript 3 and Flash.
Welcome to the oldest Flash eye candy effect ever.
I’ll show you how to create a magnifying effect, yes, the same old effect you see in the web since Actionscript was AS1, but this time is AS3 only and will give you some hints about Bitmap, BitmapData and DisplacementMapFilter classes.
The photo in the example comes from Flickr. Should this infringe some copyright, it wasn’t me.
First, let me show you the movieclips I’m exporting to Actionscript:
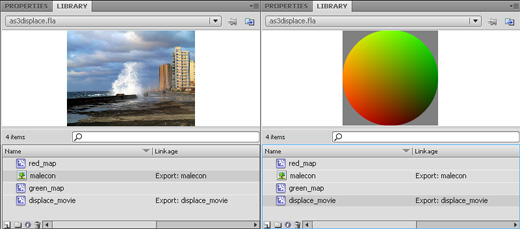
on the left side, a photo exported as malecon (that’s the name of the avenue), on the right side a movieclip exported as displace_movie. red_map and green_map are just two movieclips combined to achieve the gradient sphere.
You can find all information about the displacement filter and the meaning of that gradient sphere on a grey background at Understanding Flash displacement map filter.
It’s an old AS2 example but the theory is still the same.
Now let’s take a look at the script:
package {
	import flash.display.Sprite;
	import flash.display.Bitmap;
	import flash.display.BitmapData;
	import flash.filters.DisplacementMapFilter;
	import flash.geom.Point;
	import flash.events.Event;
	public class as3displace extends Sprite {
		// creating a new Bitmap variable
		var the_bitmap:Bitmap = new Bitmap();
		// creating a variable to store "malecon" image.
		// notice you MUST specify width and height or you'll get an error
		// 1136: Incorrect number of arguments.  Expected 2.
		var the_image=new malecon(500,373);
		// creating a variable to store the "displace_movie" movieclip
		var the_displace:displace_movie=new displace_movie();
		// creating a point at the upper left corner
		var starting_point:Point=new Point(0,0);
		// creating a 100x100 bitmap data, that will contain the gradient movieclip
		var displacement_map:BitmapData=new BitmapData(100,100,true,0x808080);
		// creating the displacement map filter
		var displacement_filter:DisplacementMapFilter=new DisplacementMapFilter(displacement_map,starting_point,1,2,50,50,"color",0x000000,1);
		public function as3displace() {
			// assigning the "the_image" data (the photo) as bitmapData of "the_bitmap" variable
			the_bitmap.bitmapData=the_image;
			// in the displacement map, draw (copy) the content of "the_displace" movieclip
			// (the gradient sphere)
			displacement_map.draw(the_displace);
			// placing "the_bitmap" on the stage
			addChild(the_bitmap);
			// listener that triggers at every frame
			addEventListener(Event.ENTER_FRAME, onFrame);
		}
		public function onFrame(e:Event) {
			// changing the starting point of the displacement map filter according to mouse position
			starting_point.x=mouseX-50;
			starting_point.y=mouseY-50;
			displacement_filter.mapPoint=starting_point;
			// applying the displacement filter to "the_bitmap" (the photo)
			the_bitmap.filters=[displacement_filter];
		}
	}
}
And this is the result…
Move the mouse over the photo.
The main difference with the rest of the tutorials you will find in internet, is I don’t place the photo directly on the stage and I don’t even import it using something like [Embed(source="picture.jpg")].
Everything is handled by ActionScript
Download the source code and enjoy.
Never miss an update! Subscribe, and I will bother you by email only when a new game or full source code comes out.